Following article describes my creative process behind creating a vector synthesizer. It features: a generative sequencer , sound engine and visuals. I have designed the sequencer to be controlled by a MPE controller. Its sound engine is MIDI controllable but you can achieve interesting results using Leap Motion to shape the oscillator. The visuals provides visual feedback to enrich the sound experience.
The sequencer
This project started from an idea to use a MPE keyboard slide (up-down) parameters as control parameters. Each note value separately. Probability of a note occurrence in the generated melody pattern is directly related to this value. The idea is that you do not play the keyboard in a normal manner but rather influence the way the sequence is being created. I understand this might not be the best use of a MPE controller but nonetheless I have approached this project as an interesting challenge.
While I was developing the patch I have used ROLI Seaboard Block (one octave MPE keyboard). It should also work with any MIDI controller with 12 faders or knobs after reworking the MPE-probability part. It is also possible to set the note probability values manually.
MPE-probability
In order to create a sequence in a way I have described I needed to create a pattern generating algorithm. I have decided that I will start from rewriting the values to a new table. The reason being that I want to use their respective ‘probability’ as max value for a random generator. If a note is less likely to occur in the sequence the maximum random number representing it will be smaller.
Next step in the algorithm is finding the biggest number in the newly created table. This part was one of the more interesting challenges of this project. It is likely that there are community made algorithms already but I have decided to solve this my way. Knowing that the probabilities range is between 127 and 0 I have created an algorithm that compares stored numbers to the max value and decrease it on each cycle if it hasn’t been found. In order to speed up the process I have later decided to set the initial decrease in steps of 10 and if the threshold has been passed – jump back 10 units and start decreasing the number being compared again in steps of 1.
Last step in the algorithm is rewriting the selected value index to a new array. Index represents note. This new array will be the generated melodic sequence I wanted to achieve. For each step of the sequence the process is repeated. I have decided that the resulting sequence will have 16 steps.

Complexity
At first I decided to loop the generated sequence and have a dedicated button for triggering ‘pattern creating’ algorithm. As I was testing my idea I have decided that the sequence should be ‘rewritten’ after each play cycle finishes. Is is complicated to read and write the same pattern at once. I order to avoid this I have decided to create two patterns that can be played back interchangeably.
While one sequence will be played back the other one will be rewritten and vice versa. This is proven to be a problem at the higher tempo rates. Problem would occur if the second pattern has not finished being created while the first one has finished playing (complete run of the pattern generator takes around 3 second to create 16 steps). I have solved it by creating two separate instances of pattern generator and making each of them create two patterns. The final patch has four patterns that are played sequentially. Two pattern generators can work simultaneously if tempo of the playback requires it.
The sound engine
On a separate occasion I came up with the idea to have a go on creating a complex waveform generator. I was inspired by the even-odd control available in the Buchla 259 complex waveform generator. I have decided to recreate this function in my own way.
Even-odd
I have decided to create this using build in Pure Data objects used for creating a waveform from a user-defined series of harmonics (sinesum, arrays and tabread oscillators. Floss manual have a good description of those). I’ve created each of the following waveforms from the series of 64 harmonics.
Apparent choice for the waveform made of odd harmonics only was a square wave. For the even harmonics I have encountered a surprise at first as the initial result was a saw wave one octave up from the fundamental. After releasing the obviousness of the problem I have decided to make few adjustments. I have reintroduced the fundamental to the mix and change phases of selected harmonics (I have ended up inverting the phase of every fifth harmonic).
In order to achieve smooth morphing between two shapes I have decided to use VCAS. I have came to conclusion that the middle position between those two opposite shapes should be more ‘plain’ wave in terms of timbre. I thought about a sine wave shape – which both share in the form of fundamental frequency component – but went with the triangle as it has more edge (and a touch of more richer harmonic content) and I have found it more interesting.
Penta-morph oscillator
I have decided to add two more wave shapes to the mixture – saw in two variants: a positive and a negative ramp. Both shapes share the same harmonic series but negative ramp has phase of every second one inverted. It gives different results when morphing between a chosen shape and each version of the saw. In order to make a smooth transition between each of the described five shapes I have decided to spread them across the XY plane. This way it is possible to mix any adjacent wave shapes. Mixing even and odd harmonics would give saw-ish results and mixing negative and positive ramp would result in a square wave – both those waves are already available amongst shapes chosen by me.

The way the ‘clean’ shapes are spread over the XY plane:
- triangle – the middle of the plane
- ramp (positive ramp) – top left corner
- saw (negative ramp) – bottom right corner
- odd harmonics waveform (square) – top right corner
- even harmonics waveform – bottom right corner
By moving clockwise on the edge of the plane the result will be a morph between four shapes (pulse-saw-even harmonics-ramp and so on). Gradually sliding from the edge to the centre will increase amount of the triangle wave in the mix.
2D-envelope

In order to control the XY coordinates (thus control the shape of the oscillator) I have used the same solution as in the previous project. With it it is possible to either use mouse cursor coordinates [relative to the edges of the GEM window] or use a MIDI controller (i.e. Leap Motion(see: how to connect LM to pd), joystick, faders, knobs etc) for controlling the X and Y values.
I have never made a vector synthesiser before but I have figured this might be the right time. I have decided to build a 2D envelope with selectable number of stages and adjustable morphing time between them. After playing with the work-in-progress version I have decided to drop the modifiable time option. Unfortunately it created problems when I was changing BPM of the sequencer. I decided that the tempo and selected number of stages will determine the morphing time.
The code for adjustable morphing time is still there – just omitted for the time being.
Sequencer set at 120 BPM with 60% gate length results in a 150ms note. Envelope set to 2 stages will have two steps each morphing approximately (150ms / 2) 75ms. The same tempo with envelope step number set to 5 will result in five 30ms morphs. With tempo doubled (240 BPM) and envelope set to 3 stages the note will last 75ms and morph will take 25ms.
In the finale version of the patch it is possible to set the wave shaping control to ‘controller’ (mouse or MIDI), ‘envelope’ or a mixture of both. I have came to a conclusion that adding controllable blend created more possibilities of wave shaping in my project.
AHDSR-envelope

Separate AHDSR envelope controls amplitude of the synthesizers sound engine. Duration of each stage of this envelope are also dependent on BPM rate of the sequencer. This ways it is easier to achieve useful results – without the need to adjust the envelope length after changing tempo.
My finishing touch is a stereo ring modulator at the end of the audio chain. I have original made it for ZD-10 synthesizer. I have set it two octaves down from the main oscillator with a additional detune controlled by an envelope follower.
The visuals
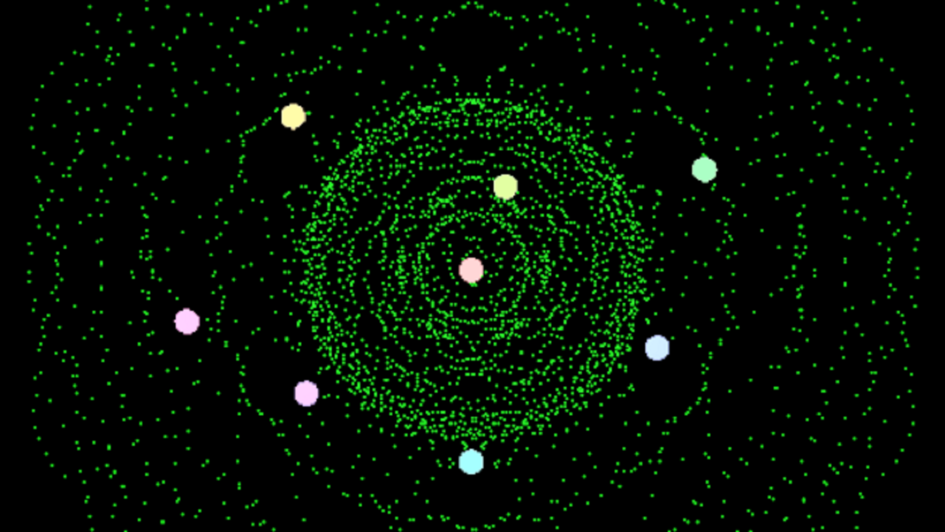
Gem window displays number of things. White dot (with a trail) represents the current XY coordinates of the main oscillator shape. 8 coloured dots represents XY coordinates for each of the stages of the 2D envelope. Disabling a step of the envelope will make the corresponding dot colour darker. Lissajous curve visible behind the dots depends on the shape of the main oscillator. It will change colour from purple to green as the amplitude of the main VCA increases. The colour of this shape is deliberately set so dark in order to avoid causing eyestrain at faster BPM rates.
Controls of the vector synthesizer
MPE compatible MIDI keyboard will work the best with the generative nature of the sequencer. Each note slide up/down value (MIDI CC 74) will controls possibility of this note occurrence in the sequence. It is also possible to use a standard MIDI keyboard and control the probability manually (in the visible table).
User can change the shape of the main oscillator using a controller, 2D envelope or any mixture of both. 2D envelope steps can be set using a controller. In order to store it you need to press one of the numeric keys between 1 and 8. For this to work you need to first press ‘k’ to enable writing to memory. User can adjust length of the 2D envelope between 2 and 8 stages.
Leave a Reply